---
title: SpringBoot
author: TianZD
top: true
cover: true
toc: true
mathjax: false
summary: SpringBoot框架学习笔记,粗略学了一下,没有参考价值
tags:
- SpringBoot
- 学习笔记
categories:
- java
reprintPolicy: cc_by
abbrlink: 6f2612a2
date: 2022-04-29 11:07:58
coverImg:
img:
password:
---
[toc]
# SpringBoot
# 1、概述
## 1.1、学习总结
* JavaSE:oop
* mysql:持久化
* html+css+js+jquery+框架:视图
* javaWeb:独立开发MVC三层架构的网站
* ssm:框架:简化了开发的流程,配置繁琐
war包:tomcat运行
* spring简化:SpringBoot,jar包,内嵌tomcat,微服务架构
* springcloud:管理微服务
## 1.2、spring
**Spring理念、目的**
spring是**为了解决企业级应用开发的复杂性**创建的,**简化开发**
**Spring如何简化开发**
1. 基于pojo的轻量级和最小入侵编程
2. 通过IOC,依赖注入(DI)和面向接口实现松耦合
3. 基于切面(AOP)和惯例进行声明式编程
4. 通过切面和模板(template)减少样式代码
> 区别
程序=数据结构+算法:程序员
程序=面向对象+框架:码农
## 1.3、微服务
> 什么是微服务
微服务是一种**架构风格**,要求在开发一个应用的时候,应用必须构建成一系列小服务的组合,可以通过http的方式通信
> 单体运行架构
all in one,所用的应用服务都封装在一个应用中
> 微服务架构
打破all in one的架构方式,把每个功能元素苏里出来,把苏里出来的功能元素动态组合,需要的功能元素才去拿来组合,需要多一时可以整合多个功能元素,所以微服务架构是对功能元素进行复制,没有对整个应用进行复制
* 节省了调用资源
* 每个功能元素的服务都是一个可替换的,可独立升级的软件代码
## 1.4、SpringBoot
> 概述
Spring Boot 是由 Pivotal 团队提供的全新框架,其设计目的是用来简化新 Spring 应用的初始搭建以及开发过程。该框架使用了特定的方式来进行配置,从而使开发人员不再需要定义样板化的配置。用我的话来理解,就是 Spring Boot 其实不是什么新的框架,它默认配置了很多框架的使用方式,就像 Maven 整合了所有的 Jar 包,Spring Boot 整合了所有的框架。
> 优势
其实就是简单、快速、方便!平时如果我们需要搭建一个 Spring Web 项目的时候需要怎么做呢?
* 1)配置 web.xml,加载 Spring 和 Spring mvc
* 2)配置数据库连接、配置 Spring 事务
* 3)配置加载配置文件的读取,开启注解
* 4)配置日志文件
* …
* 配置完成之后部署 Tomcat 调试
* …
现在非常流行微服务,如果我这个项目仅仅只是需要发送一个邮件,如果我的项目仅仅是生产一个积分;我都需要这样折腾一遍!
但是如果使用 Spring Boot 呢?
很简单,我仅仅只需要非常少的几个配置就可以迅速方便的搭建起来一套 Web 项目或者是构建一个微服务!
## 1.5、Spring Boot、Spring MVC 和 Spring
分别描述各自的特征:
* Spring 框架就像一个**家族**,有众多衍生产品例如 boot、security、jpa等等;但他们的基础都是Spring 的**ioc和 aop**,**ioc 提供了依赖注入的容器**, **aop解决了面向切面编程**,然后在此两者的基础上实现了其他延伸产品的高级功能。
* Spring MVC提供了一种**轻度耦合的方式来开发web应用**;它是**Spring的一个模块**,是**一个web框架**;通过**DispatcherServlet,** ModelAndView 和 View Resolver,开发web应用变得很容易;解决的问题领域是网站应用程序或者服务开发——URL路由、Session、模板引擎、静态Web资源等等。
* Spring Boot实现了auto-configuration**自动配置**(另外三大神器actuator监控,cli命令行接口,starter依赖),降低了项目搭建的复杂度。它主要是为了解决使用Spring框架需要进行大量的配置太麻烦的问题,所以它并不是用来替代Spring的解决方案,而是和Spring框架紧密结合用于提升Spring开发者体验的工具;同时它集成了大量常用的第三方库配置(例如Jackson, JDBC, Mongo, Redis, Mail等等),Spring Boot应用中这些第三方库几乎可以零配置的开箱即用(out-of-the-box)。
所以,用最简练的语言概括就是:
* Spring 是一个“引擎”;
* Spring MVC 是基于Spring的一个 MVC 框架;
* Spring Boot 是基于Spring4的条件注册的一套快速开发整合包。
# 2、SpringBoot程序
## 2.1、初始化
> 创建:
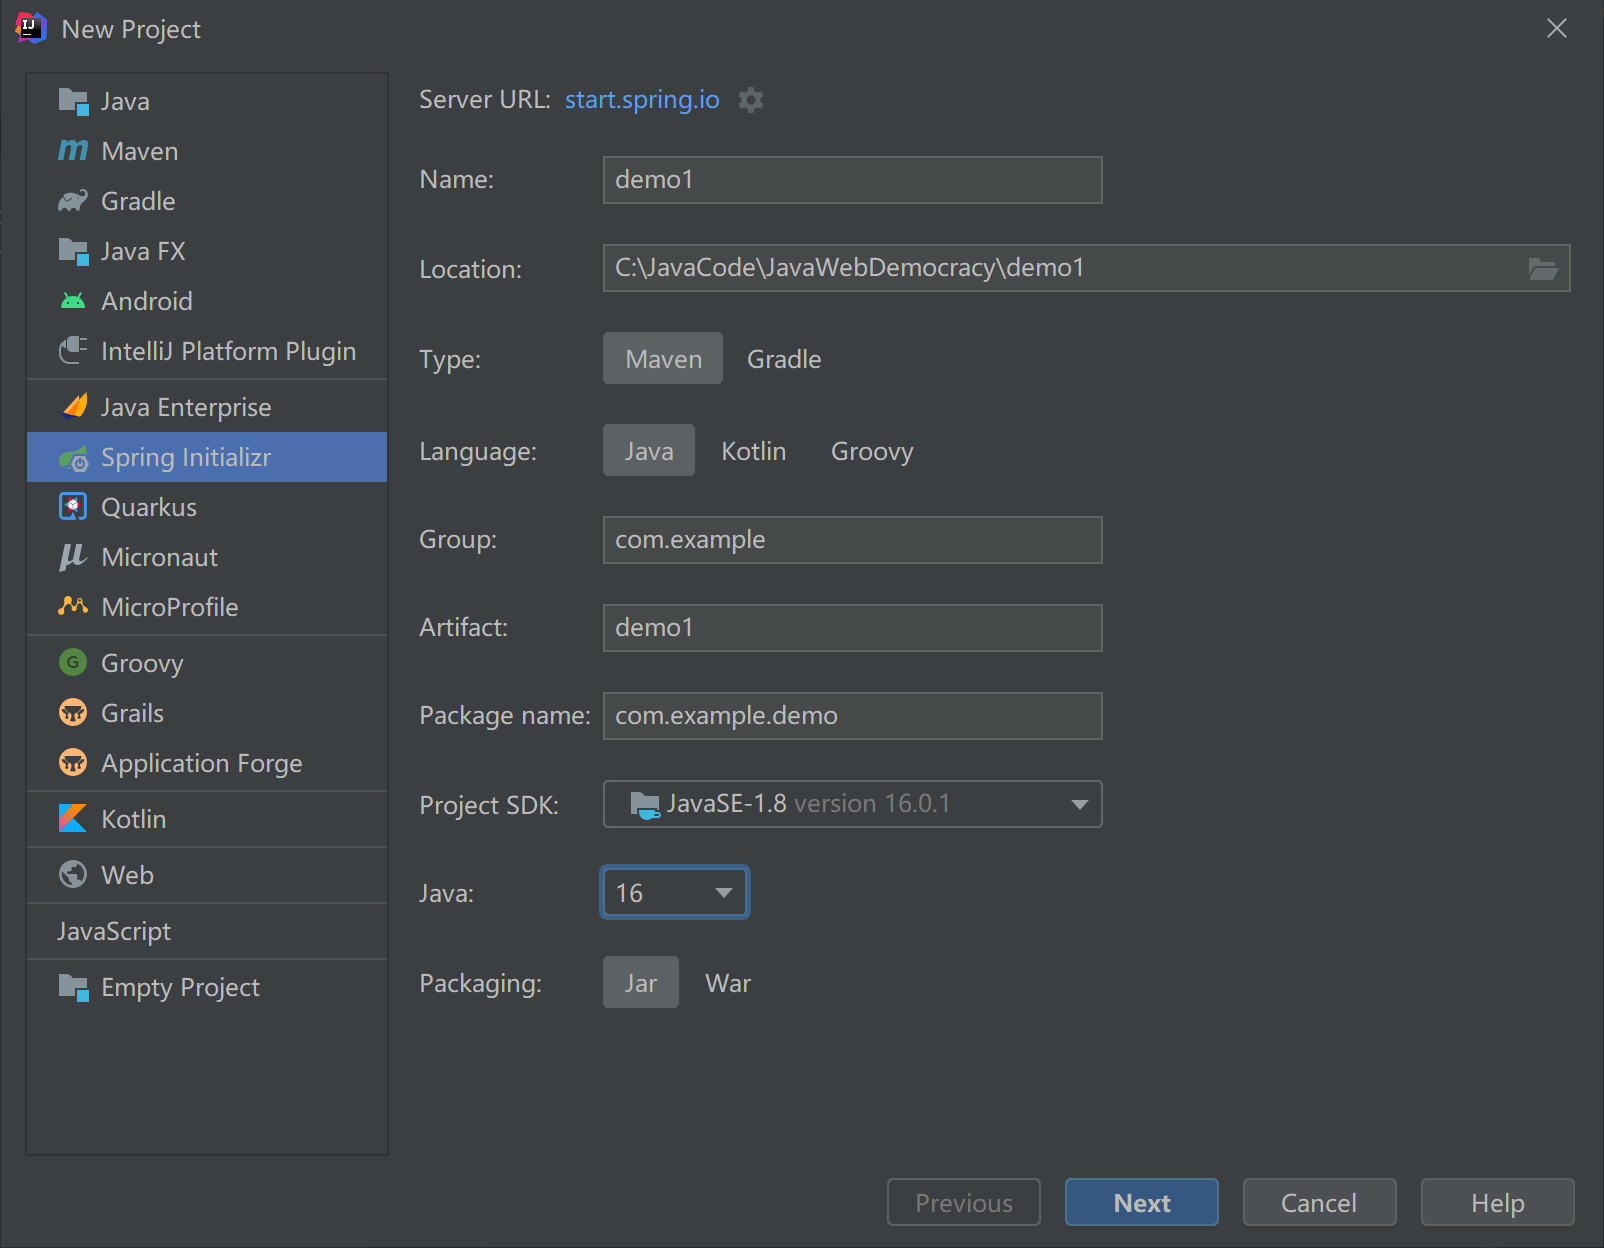
* IDEA新建项目,选择SpringInitializr
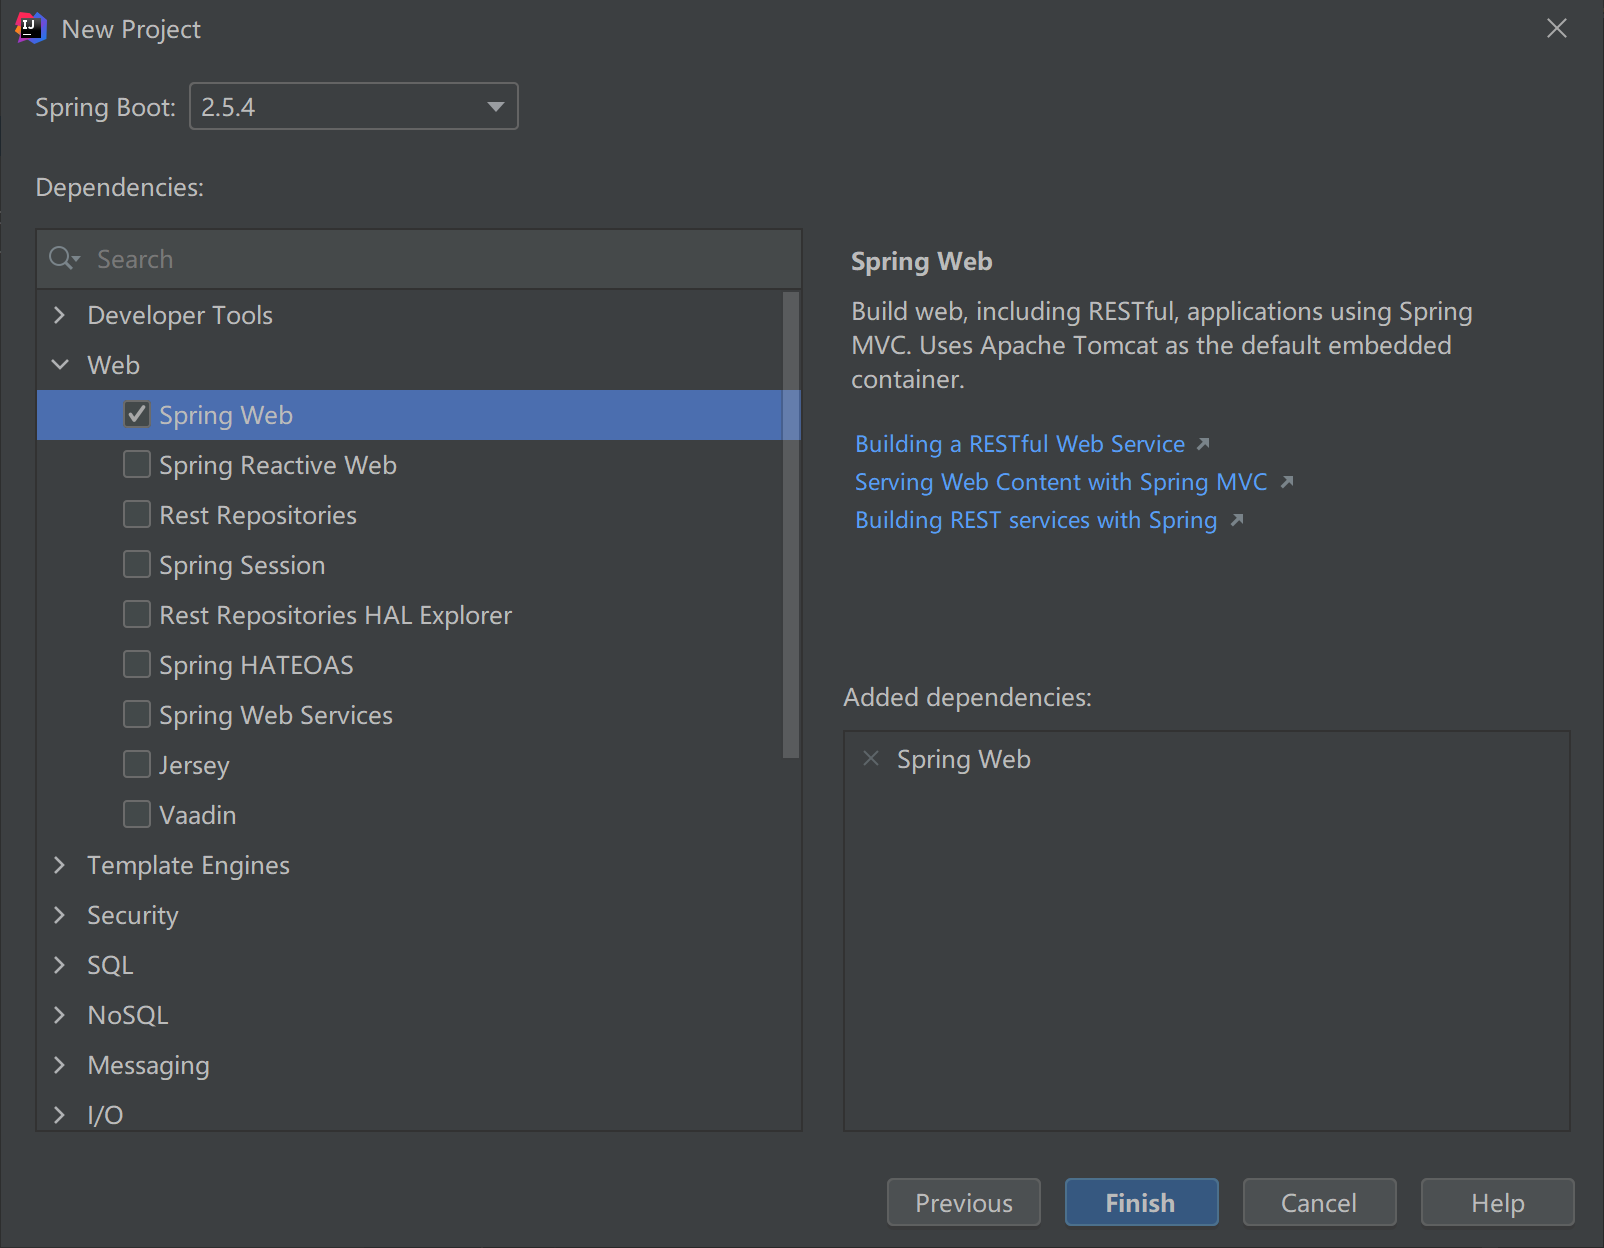
* 勾选SpringWeb
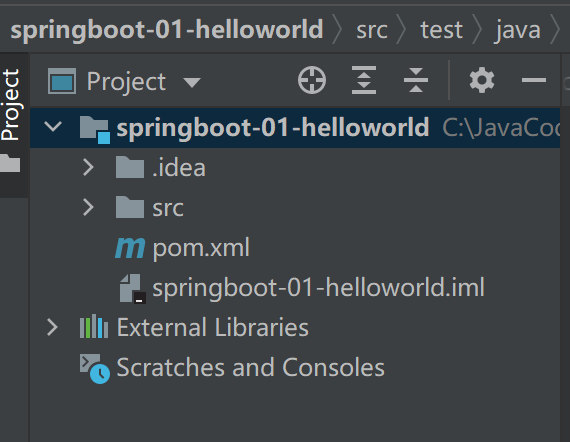
* 新建之后,删除多余文件
> 分析
默认自动生成一下文件
* springboot启动文件,启动器
```java
package com.tian.springboot01helloworld;
import org.springframework.boot.SpringApplication;
import org.springframework.boot.autoconfigure.SpringBootApplication;
@SpringBootApplication
public class Springboot01HelloworldApplication {
public static void main(String[] args) {
SpringApplication.run(Springboot01HelloworldApplication.class, args);
}
}
```
* application.properties,默认为空
* pop.xml 依赖
```xml
4.0.0
org.springframework.boot
spring-boot-starter-web
2.5.4
spring-boot-starter-web
Starter for building web, including RESTful, applications using Spring MVC. Uses Tomcat as the default embedded container
https://spring.io/projects/spring-boot
Pivotal Software, Inc.
https://spring.io
Apache License, Version 2.0
https://www.apache.org/licenses/LICENSE-2.0
Pivotal
info@pivotal.io
Pivotal Software, Inc.
https://www.spring.io
scm:git:git://github.com/spring-projects/spring-boot.git
scm:git:ssh://git@github.com/spring-projects/spring-boot.git
https://github.com/spring-projects/spring-boot
GitHub
https://github.com/spring-projects/spring-boot/issues
org.springframework.boot
spring-boot-starter
2.5.4
compile
org.springframework.boot
spring-boot-starter-json
2.5.4
compile
org.springframework.boot
spring-boot-starter-tomcat
2.5.4
compile
org.springframework
spring-web
5.3.9
compile
org.springframework
spring-webmvc
5.3.9
compile
```
* 测试文件
```java
package com.tian.springboot01helloworld;
import org.junit.jupiter.api.Test;
import org.springframework.boot.test.context.SpringBootTest;
@SpringBootTest
class Springboot01HelloworldApplicationTests {
@Test
void contextLoads() {
}
}
```
> 打jar包
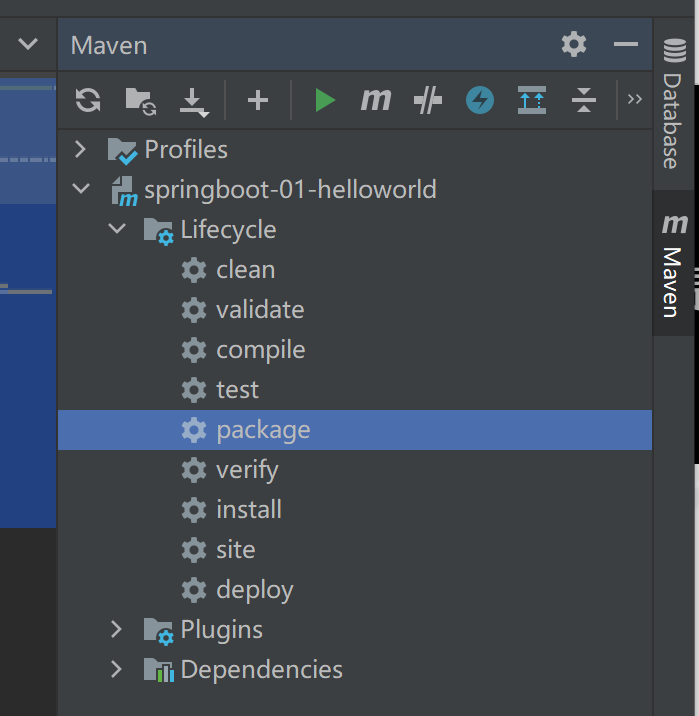
* 在右侧maven中,双击package,自动打jar包
* 在target目录下,生成一个jar包
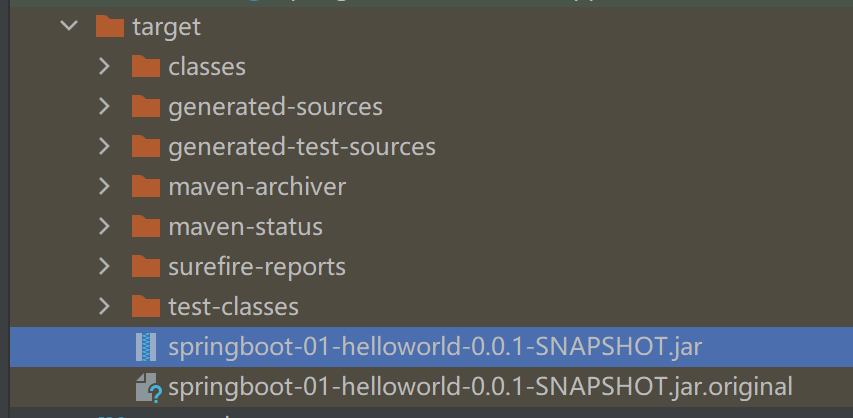
* 在命令行进入jar包所在的目录
* 执行`java -jar .\springboot-01-helloworld-0.0.1-SNAPSHOT.jar`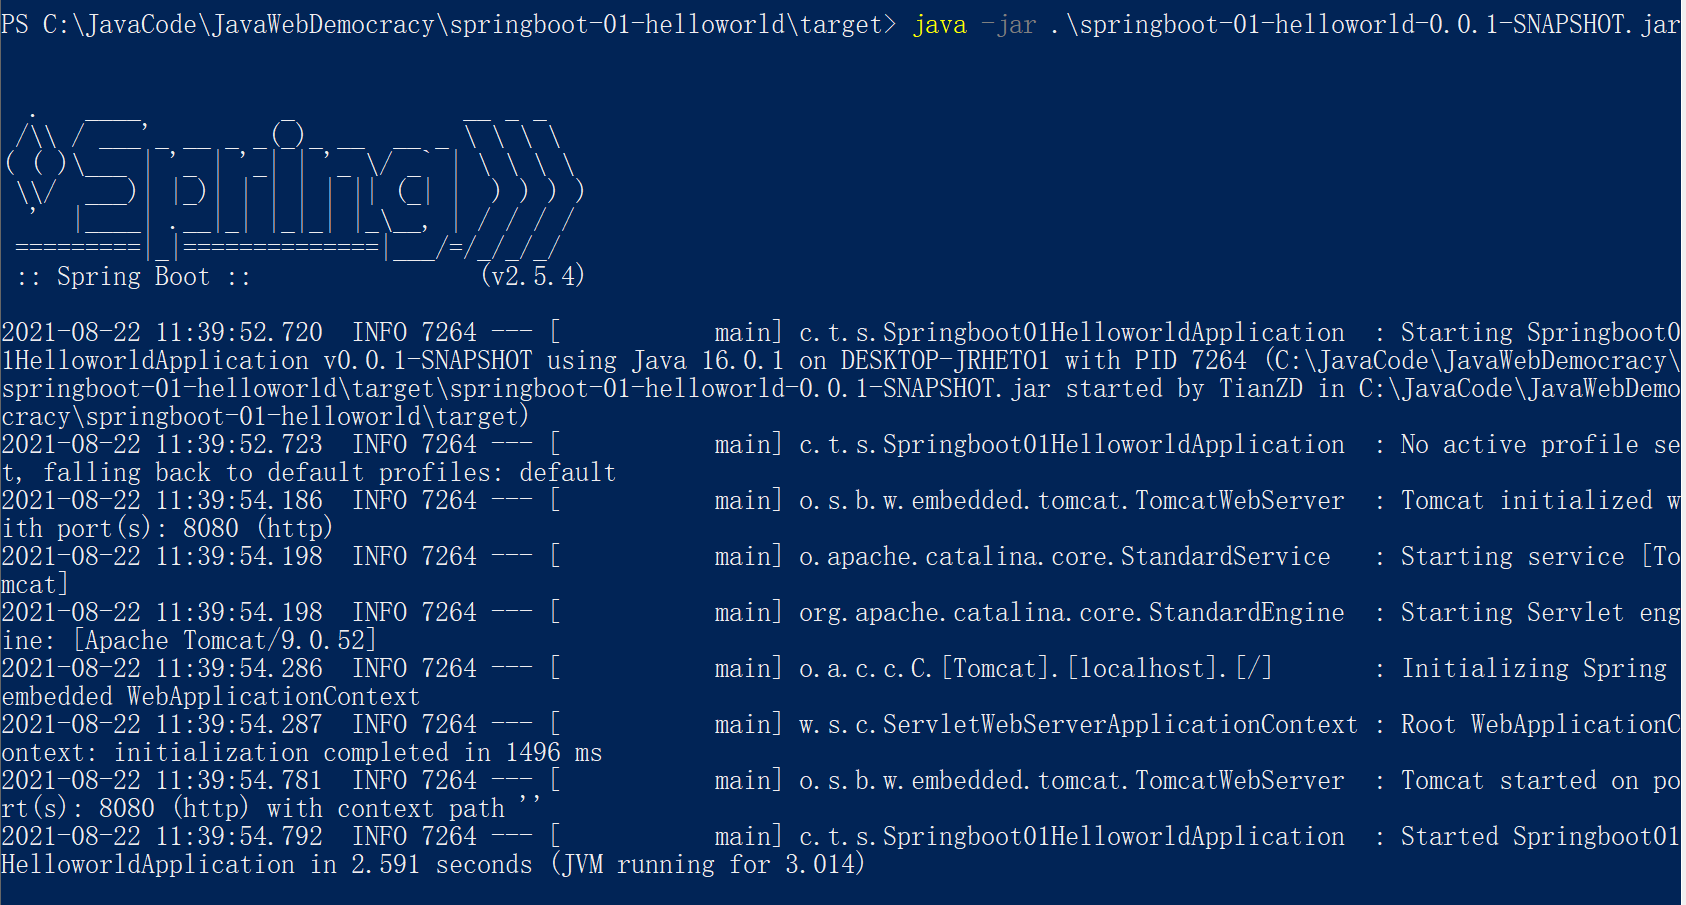
> 新建目录结构
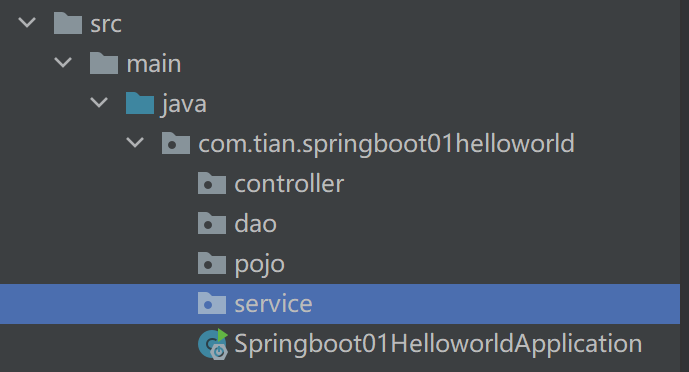
在Springboot启动程序的同级目录下新建controller、dao、pojo、service
> 新建简单接口
```java
package com.tian.springboot01helloworld.controller;
import org.springframework.web.bind.annotation.RequestMapping;
import org.springframework.web.bind.annotation.RestController;
@RestController
public class HelloController {
@RequestMapping("/hello")
public String hello() {
// 调用业务,接收前端参数
return "hello,world!";
}
}
```
`@RestController` 的意思就是 Controller 里面的方法都以 json 格式输出,不用再写什么 jackjson 配置的了!
> 浏览器访问
## 1.2、配置
> 更改项目端口号
application.properties
```properties
# 更改端口号
server.port=8081
```
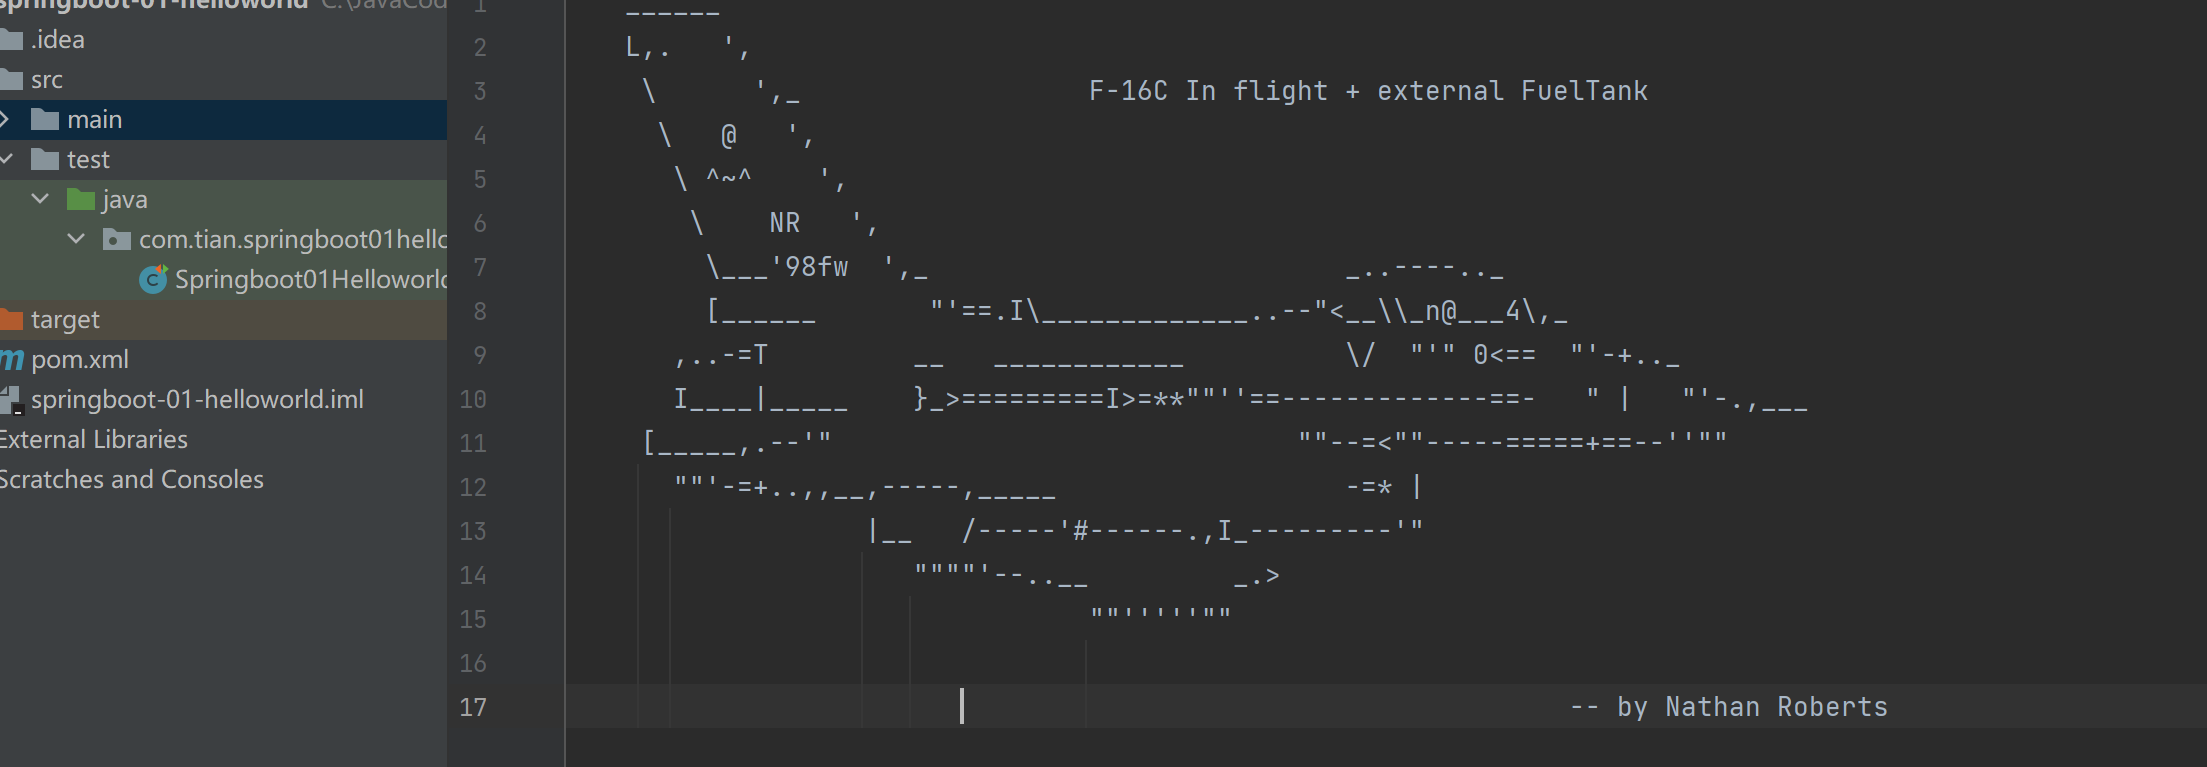
> 更改banner
* 百度搜索springboot banner在线生成,并复制
* 在resources下创建`banner.txt`,并粘贴进去
> 开发环境的热启动
热启动在正常开发项目中已经很常见了吧,虽然平时开发web项目过程中,改动项目启重启总是报错;但springBoot对调试支持很好,修改之后可以实时生效,需要添加以下的配置:
```xml
org.springframework.boot
spring-boot-devtools
true
org.springframework.boot
spring-boot-maven-plugin
true
```
该模块在完整的打包环境下运行的时候会被禁用。如果你使用 `java -jar`启动应用或者用一个特定的 classloader 启动,它会认为这是一个“生产环境”。
# 3、原理
## 3.1、启动执行流程
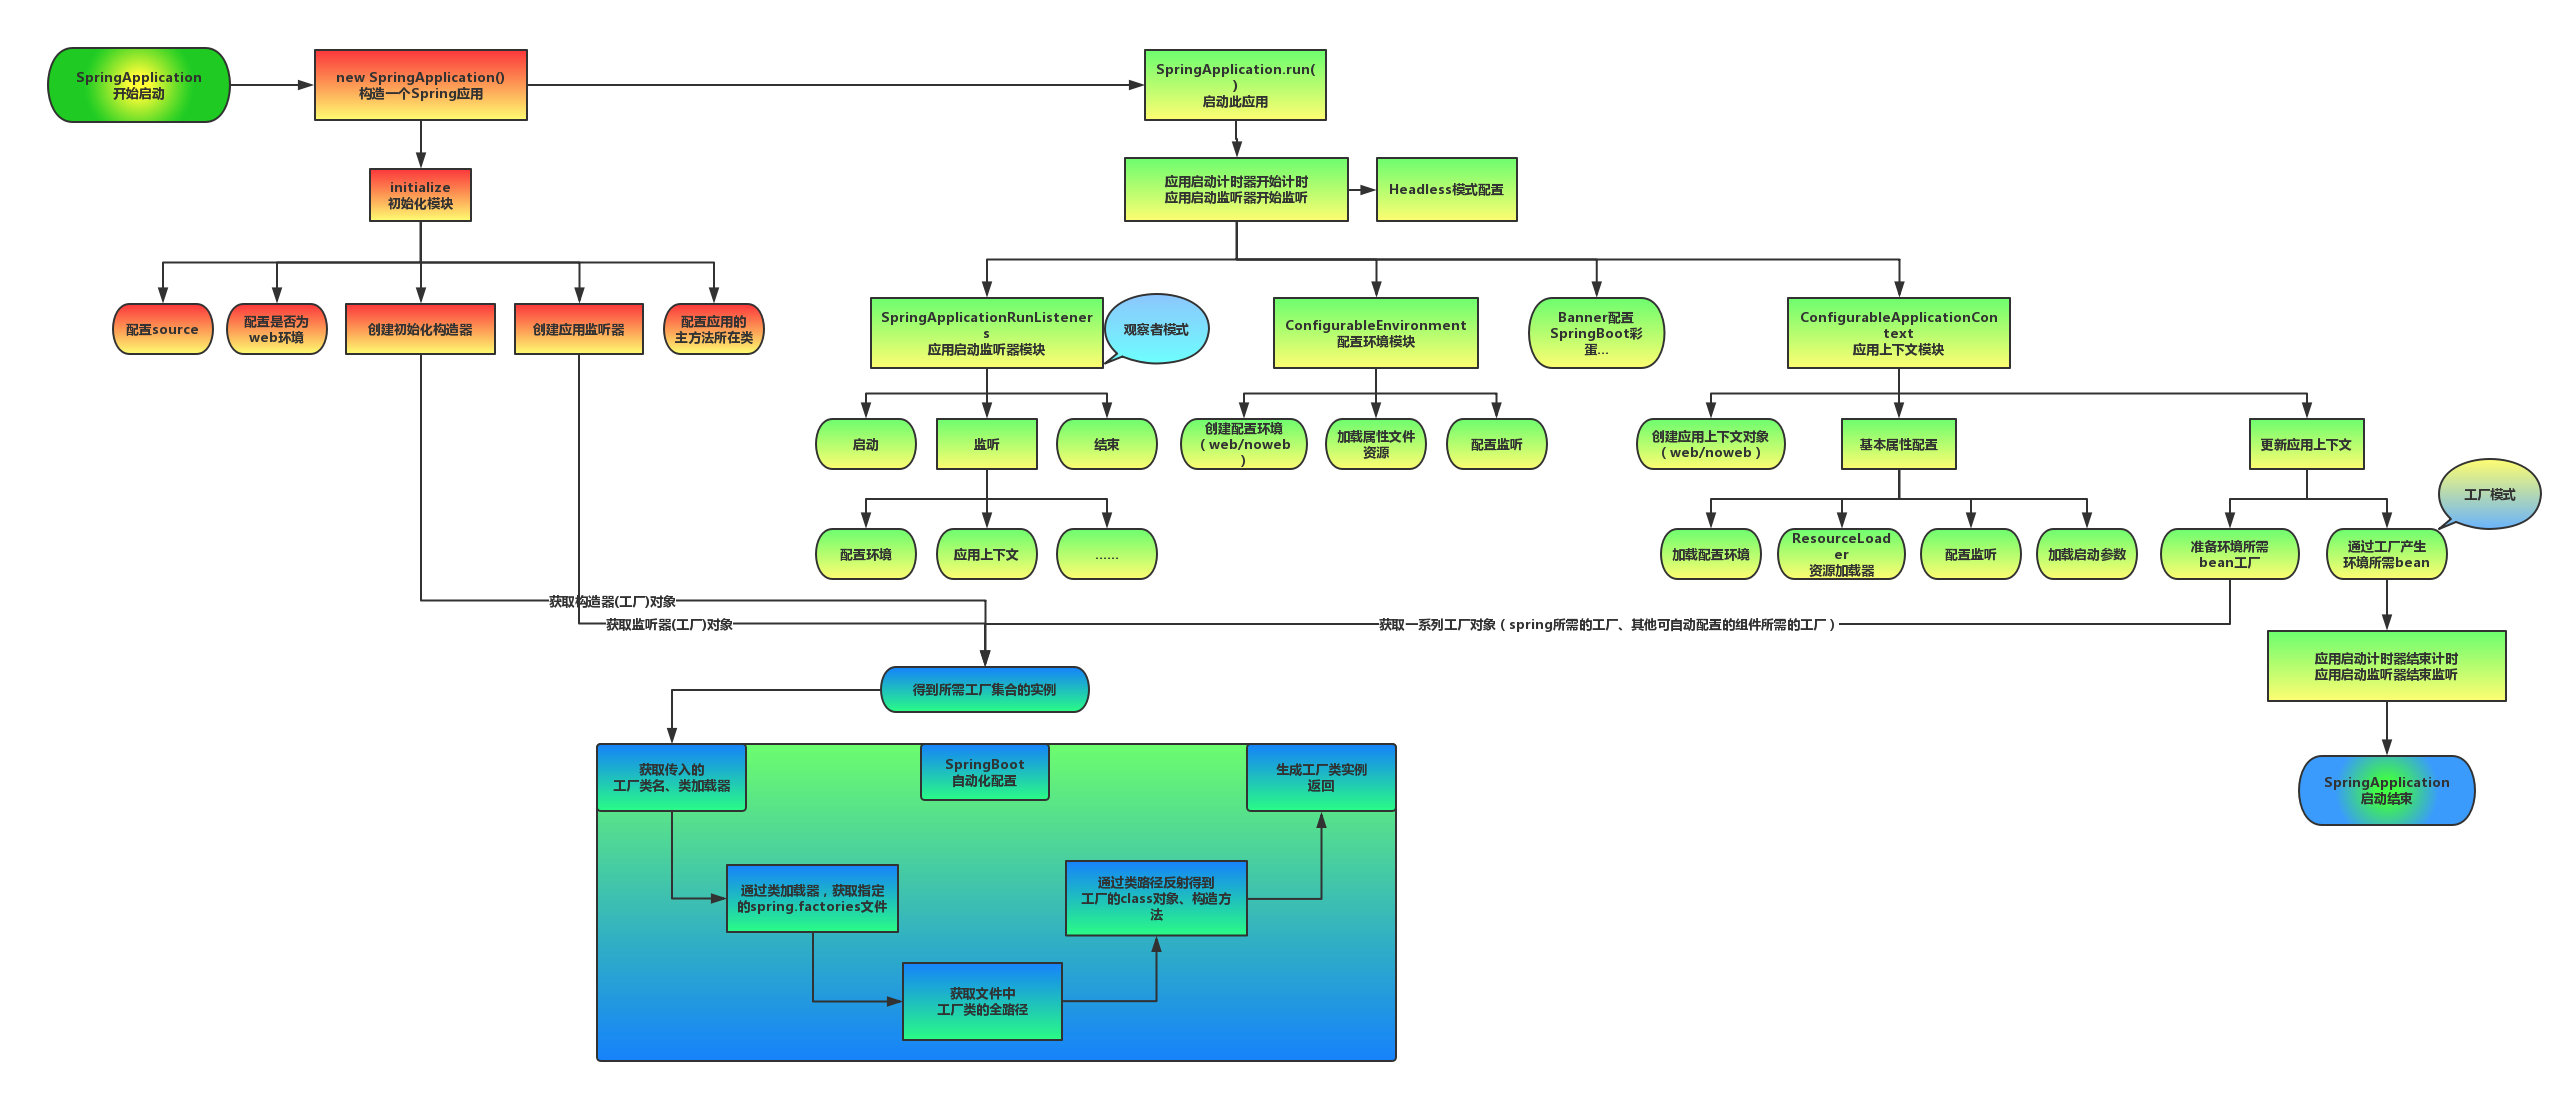
上图为SpringBoot启动结构图,我们发现启动流程主要分为三个部分:
* 第一部分进行SpringApplication的初始化模块,配置一些基本的环境变量、资源、构造器、监听器;
* 第二部分实现了应用具体的启动方案,包括启动流程的监听模块、加载配置环境模块、及核心的创建上下文环境模块;
* 第三部分是自动化配置模块,该模块作为springboot自动配置核心,在后面的分析中会详细讨论。在下面的启动程序中我们会串联起结构中的主要功能。
## 3.2、入口
springboot有自己独立的启动类(独立程序)
```java
@SpringBootApplication
public class Springboot01HelloworldApplication {
public static void main(String[] args) {
SpringApplication.run(Springboot01HelloworldApplication.class, args);
}
}
```
主要包括:
* Annotation定义(@SpringBootApplication),是Spring Boot的核心注解,它其实是一个组合注解
* 类定义(SpringApplication.run):启动整个spring-boot程序,该方法所在类需要使用
## 3.3、自动配置
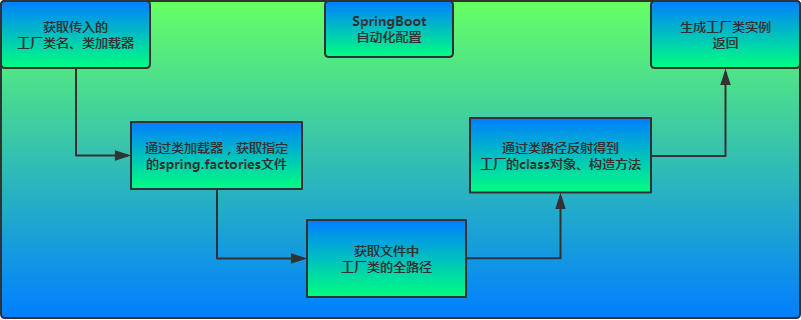
### 3.3.1、@SpringBootApplication
```java
@Target``(ElementType.TYPE) ``// 注解的适用范围,其中TYPE用于描述类、接口(包括包注解类型)或enum声明
@Retention``(RetentionPolicy.RUNTIME) ``// 注解的生命周期,保留到class文件中(三个生命周期)
@Documented` `// 表明这个注解应该被javadoc记录
@Inherited` `// 子类可以继承该注解
@SpringBootConfiguration` `// 继承了Configuration,表示当前是注解类
@EnableAutoConfiguration` `// 开启springboot的注解功能,springboot的四大神器之一,其借助@import的帮助
@ComponentScan``(excludeFilters = { ``// 扫描路径设置
@Filter``(type = FilterType.CUSTOM, classes = TypeExcludeFilter.``class``),
@Filter``(type = FilterType.CUSTOM, classes = AutoConfigurationExcludeFilter.``class``) })
public` `@interface` `SpringBootApplication {
...
}
```
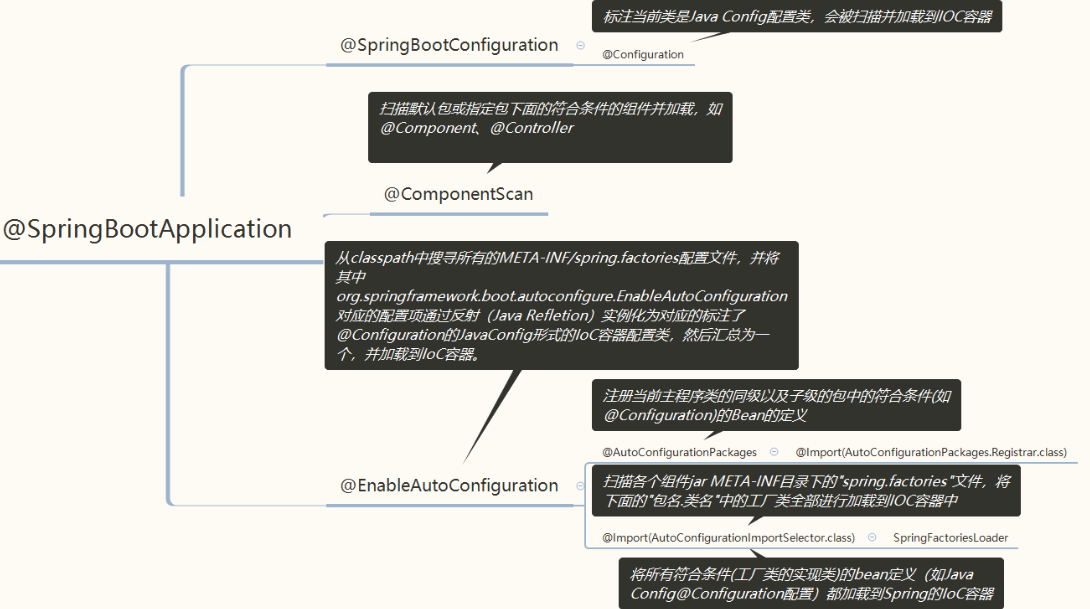
在其中比较重要的有三个注解,分别是:
* @SpringBootConfiguration // 继承了Configuration,表示当前是注解类
* @EnableAutoConfiguration // 开启自动配置
* @ComponentScan(excludeFilters = { // 扫描路径设置(具体使用待确认)扫描主类所在的同级包以及下级包里的Bean
接下来对三个注解一一详解,增加对springbootApplication的理解:
#### **@SpringBootConfiguration**
在springboot中我们大多用配置类来解决配置问题
@SpringBootConfiguration继承了Configuration,表示当前是注解类
@Configuration实际上就是一个@Component,表示一个受Spring管理的组件
#### **@ComponentScan**
* ComponentScan的功能其实就是自动扫描并加载符合条件的组件(比如@Component和@Repository等)或者bean定义,将这些bean定义加载到**IoC**容器中
* 我们可以通过basePackages等属性来**细粒度**的定制@ComponentScan自动扫描的范围,如果不指定,则**默认**Spring框架实现会从声明@ComponentScan所在类的package进行扫描。
#### **@EnableAutoConfiguration**:自动配置核心
此注解顾名思义是可以**自动配置**,所以应该是springboot中**最为重要的注解**。
```java
@Target({ElementType.TYPE})
@Retention(RetentionPolicy.RUNTIME)
@Documented
@Inherited
@AutoConfigurationPackage
@Import({AutoConfigurationImportSelector.class})
```
其中最重要的两个注解:1、@AutoConfigurationPackage【重点注解】2、@Import(AutoConfigurationImportSelector.class)【重点注解】
> `@AutoConfigurationPackage`
自动配置包。内部是采用了@Import,来给容器导入一个Registrar组件,**程序运行到这里,会去加载启动类所在包下面的所有类**
`@Import`:将一个组件注入容器中
1. **`@Import({Registrar.class})`**
```java
static class Registrar implements ImportBeanDefinitionRegistrar, DeterminableImports {
Registrar() {
}
public void registerBeanDefinitions(AnnotationMetadata metadata, BeanDefinitionRegistry registry) {
AutoConfigurationPackages.register(registry, (String[])(new AutoConfigurationPackages.PackageImports(metadata)).getPackageNames().toArray(new String[0]));
}
public Set